How to set IPSec with strongSwan
This tiny project was one of my network security assignments when I was in Bham. It might be replaced by SSL recent years but still a well designed technology

Internet Protocol security (IPSec) is a framework of open standards for helping to ensure private, secure communications over Internet Protocol (IP) networks through the use of cryptographic security services. IPSec supports network-level data integrity, data confidentiality, data origin authentication, and replay protection. Because IPSec is integrated at the Internet layer (layer 3), it provides security for almost all protocols in the TCP/IP suite, and because IPSec is applied transparently to applications, there is no need to configure separate security for each application that uses TCP/IP.
IPSec helps provide defense-in-depth against:
-
Network-based attacks from untrusted computers, attacks that can result in the denial-of-service of applications, services, or the network
-
Data corruption
-
Data theft
-
User-credential theft
-
Administrative control of servers, other computers, and the network.
You can use IPSec to defend against network-based attacks through a combination of host-based IPSec packet filtering and the enforcement of trusted communications.
strongSwan is an open source IPsec-based VPN solution, runs on Linux 2.6, 3.x and 4.x kernels, Android, FreeBSD, OS X, iOS and Windows, which could implements both the IKEv1 and IKEv2 (RFC 7296) key exchange protocols. It could be downloaded by clicking here.
1 PREPARATION
1.1 UBUNTU VIRTUAL MACHINES
In this experiment, three communicating Linux virtual machines should be available. I chose the latest version of Ubuntu Linux 64-bit installed in Oracle VM VirtualBox named Router, IPsec_1 (A side) and IPsec_2 (B side) shown in the figure below.

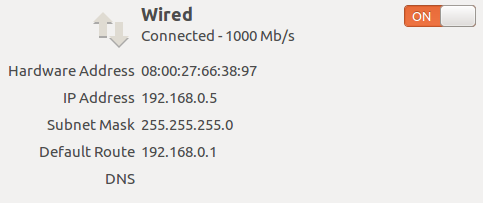
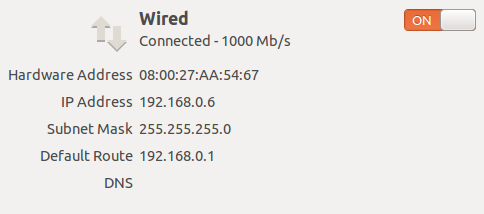
Setting IPv4 address for the Router as 192.168.0.1 at first. Powered up both Linux VPN VM, IPv4 address of A side was set as 192.168.0.5 and 192.168.0.6 for B side.
1.2 STRONGSWAN INSTALLATION & CONFIGURATION
After updating the operate system, the next step is to install StrongSwan.
Commands should be input under root permission.
aptitude install strongswan
Several libraries and tools also need to be installed for Strongswan compilation. I chose to install Opensc (supporting of HSM in strongswan), GMP Library (supporting mathematical operation in strongswan) and OpenSSL libcrypto tool (implementation of cryptography algorithms) by using commands below:
apt-get install opensc
apt-get install libgmp10
apt-get install libgmp-dev
apt-get install libssl-dev
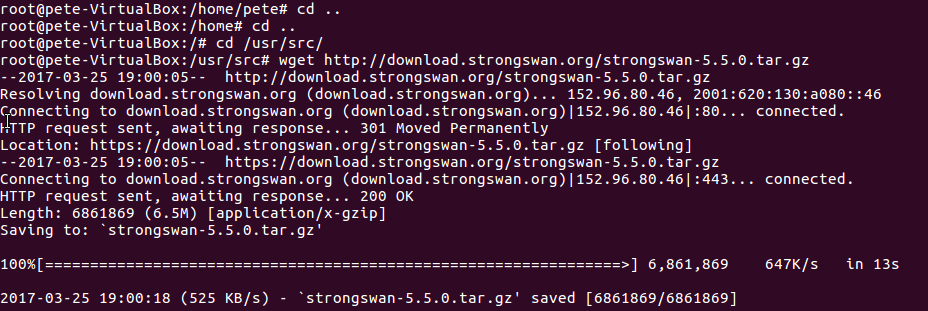
Then I downloaded strongswan-5.5.0 to the folder /usr/src/.
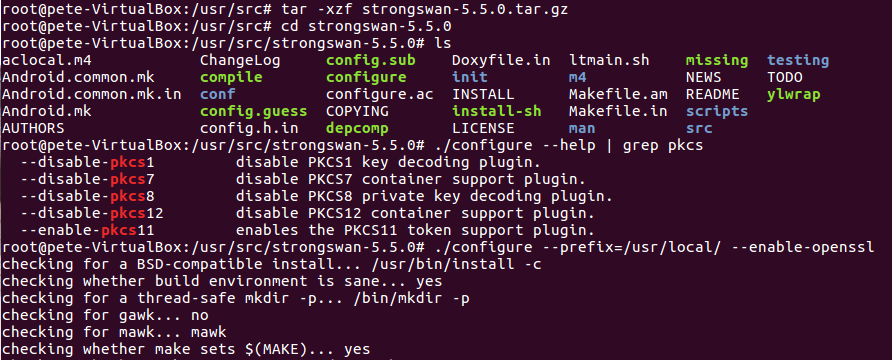
Extracted the downloaded file, checked files inside the folder and then ran script to enable HSM support and openssl support.
Used commands make and make install to compile and install strongswan under /usr/local/ directory. I did the same operation in both of A side and B side VM so that they could support tunnel mode.
2 PRE-SHARED KEY BASED TUNNEL
2.1 A side
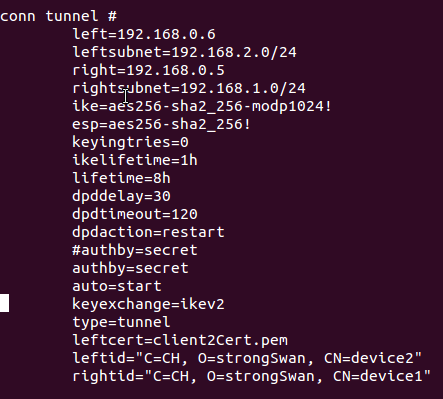
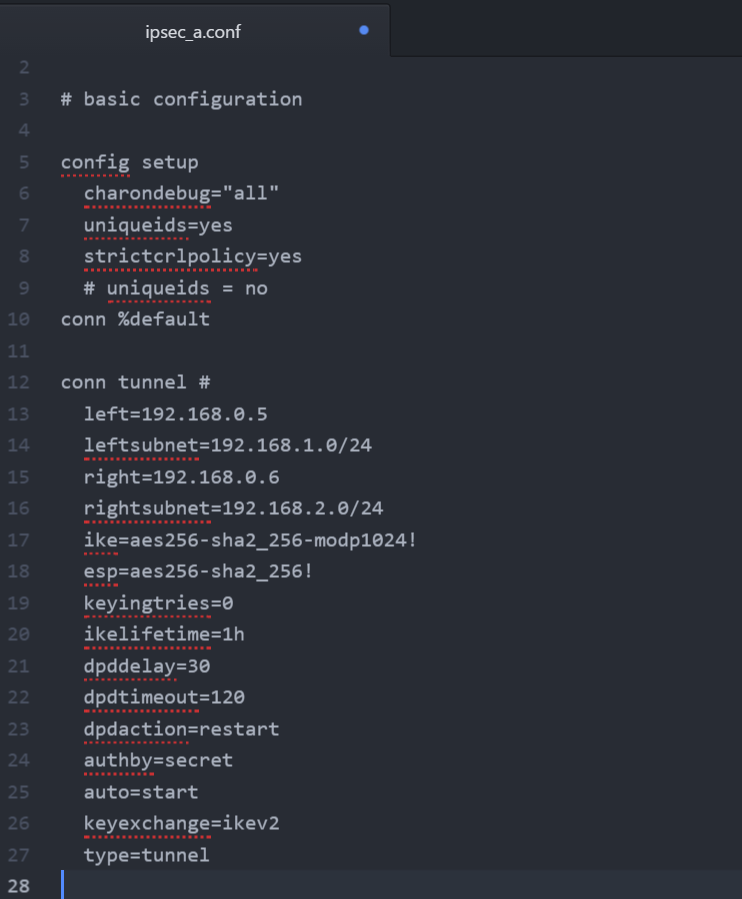
The ipsec.conf file in A side shows below, Cipher suite was chosen AES256-SHA2_256.
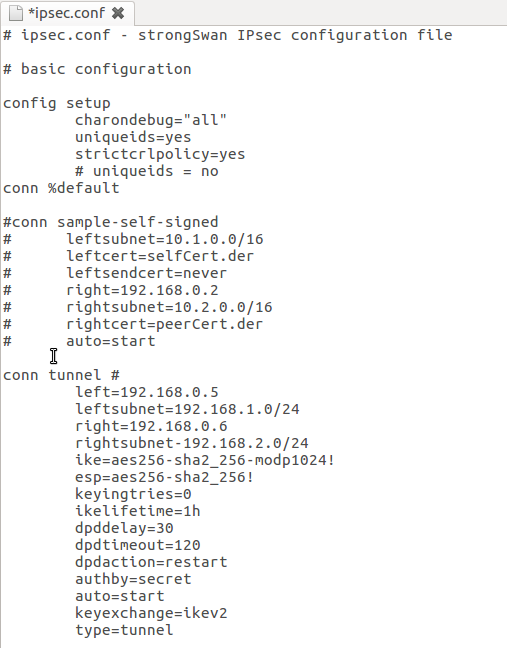
Then set Pre-Shared key as “ipsec” in the file ipsec.secrets in the path /etc/

2.2 B side
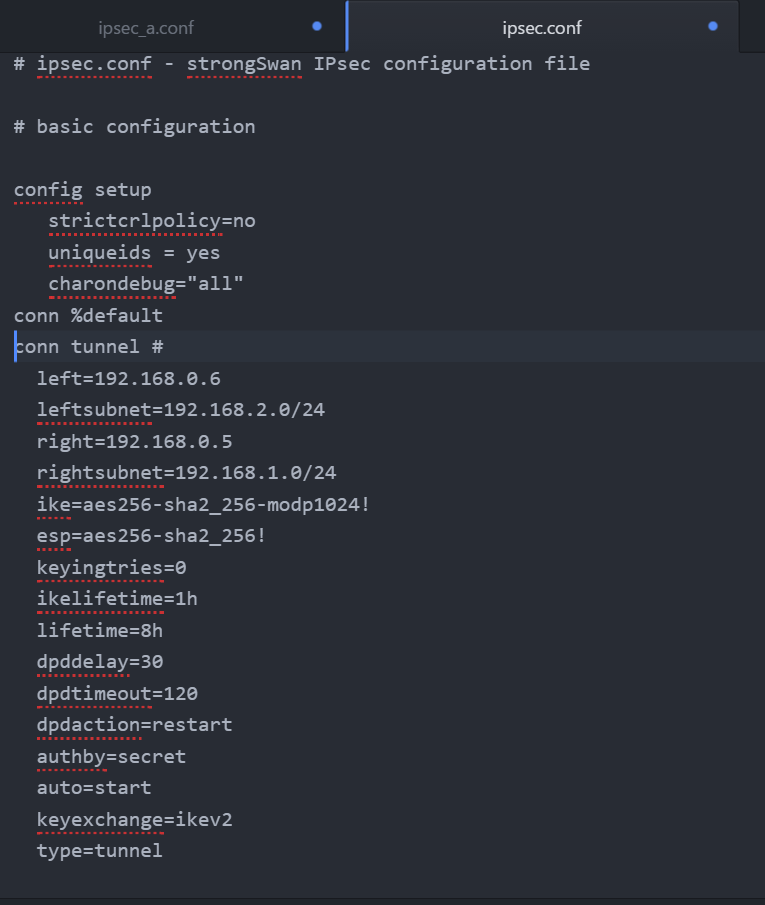
The ipsec.conf file of B side shows below,
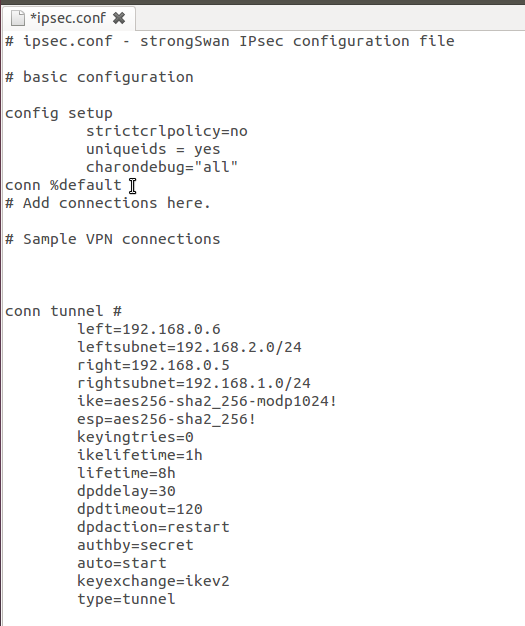
Then set Pre-Shared key as “ipsec” in the file ipsec.secrets in the path /etc/

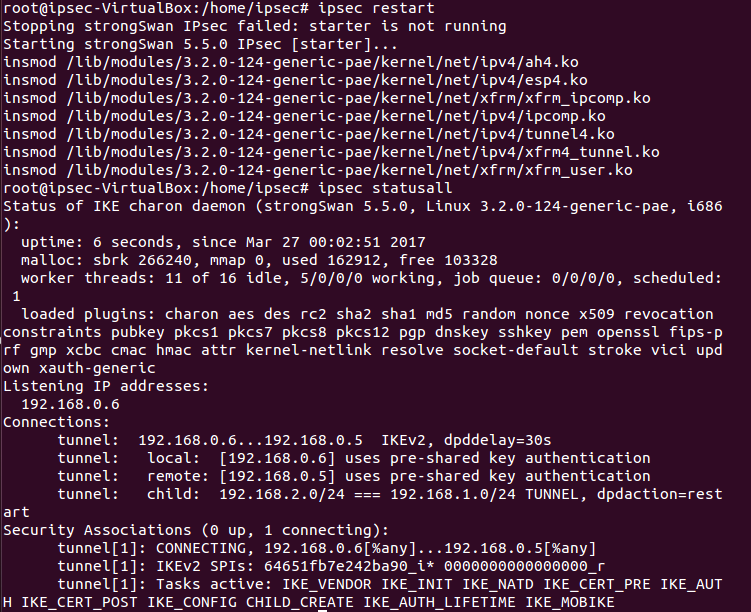
2.3 RESTART CHARON
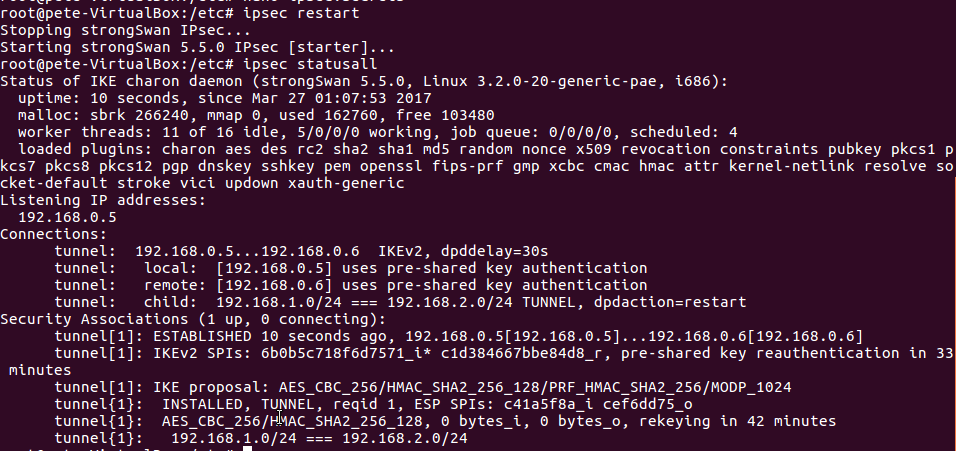
Using commands to restart the Charon daemon and view the VPN status in both A side & B side
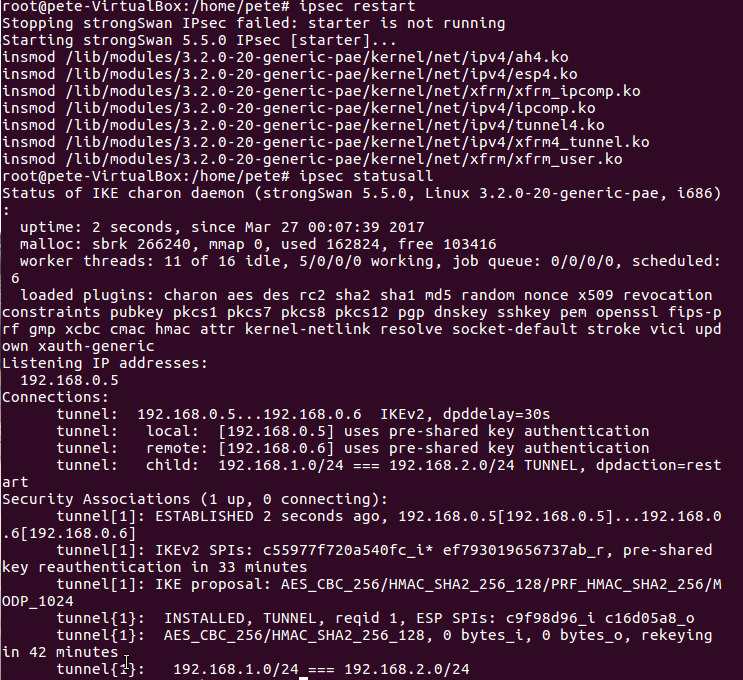
Now the connection had been established!
3 X.509 CERTIFICATE BASED TUNNEL
3.1 A side
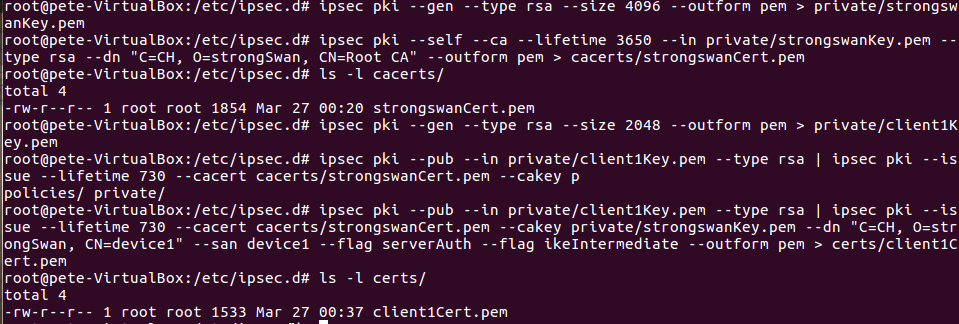
This part is about the Public Key Authentication certificate based tunnel. I used commands to create self-sign certificate and results shown below.
The next step was modificating configuration files ipsec.conf and ipsec.secrets


3.2 B side
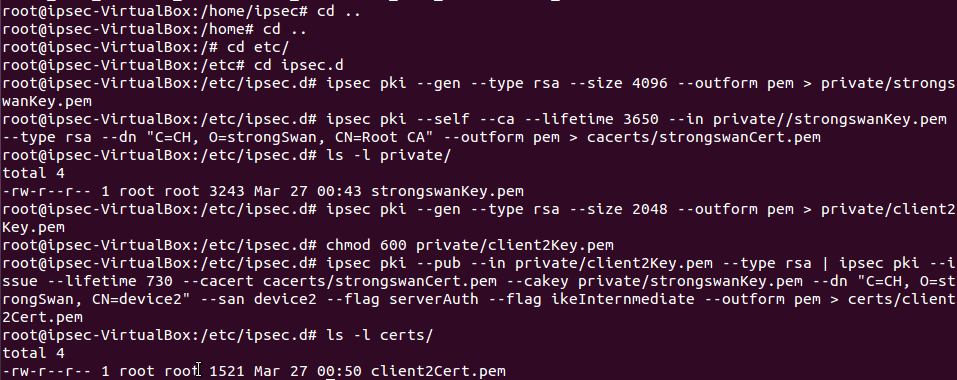
Then I did similar operations in B side like this,

3.3 Test
I restarted IPSec for both sides, then read the ipsec status. The results below shown that the connection was established successfully.

4 IPSEC.CONF FILE
4.1 A side
4.2 B side
ref:
https://technet.microsoft.com/en-us/library/cc776369(v=ws.10).aspx
https://www.strongswan.org